
摘要:go入门相关内容,参考:Go入门指南,主要总结其中:六到十一章的内容。
一、函数
1、基本介绍
1)特性
- 函数是基本的代码块。
- Go 是编译型语言,所以函数编写的顺序是无关紧要的。
- 最好把 main() 函数写在文件的前面,其他函数按照一定逻辑顺序进行编写(例如函数被调用的顺序)。
- DRY 原则:即不要重复你自己(Don’t Repeat Yourself),意思是执行特定任务的代码只能在程序里面出现一次。
- 当函数执行到代码块最后一行(} 之前)或者 return 语句的时候会退出,其中 return 语句可以带有零个或多个参数。
- 函数可以将其他函数调用作为它的参数,只要这个被调用函数的返回值个数、返回值类型和返回值的顺序与调用函数所需求的实参是一致的,例如:f1(f2(a, b))。
- Go不允许函数重载。
2)不同类型的函数
Go 里面有三种类型的函数:
- 普通的带有名字的函数
- 匿名函数或者 lambda 函数
- 方法
除了 main ()、init () 函数外,其它所有类型的函数都可以有参数与返回值。函数参数、返回值以及它们的类型被统称为函数签名。
3)语法
函数基本语法如下:
1 | func g() { |
函数被调用的基本格式如下:
1 | pack1.Function(arg1, arg2, …, argn) |
Function 是 pack1 包里面的一个函数,括号里的是被调用函数的 实参(argument):这些值被传递给被调用函数的 形参。函数被调用的时候,这些实参将被复制(简单而言)然后传递给被调用函数。
函数一般是在其他函数里面被调用的,这个其他函数被称为调用函数(calling function)。函数能多次调用其他函数,这些被调用函数按顺序(简单而言)执行,理论上,函数调用其他函数的次数是无限制的(直到函数调用栈被耗尽)。
4)方法
方法与函数的区别是,函数不属于任何类型,方法属于特定的类型。
Go语言中的 方法(Method) 是一种作用于特定类型变量的函数。这种特定类型变量叫做 接收者(Receiver)。接收者的概念就类似于其他语言中的 this 或者 self。
方法的定义格式如下:
1 | func (接收者变量 接收者类型) 方法名(参数列表) (返回参数) { |
在go语言中,没有类的概念但是可以给类型(结构体,自定义类型)定义方法。所谓方法就是定义了接受者的函数,方法和函数的写法只有一个区别,那就是 方法在 func 和标识符之间多了一个参数——接受者定义在func关键字和函数名之间。
接收者类型:接收者类型和参数类似,可以是指针类型和非指针类型。
方法的接收者什么时候适合指向结构体的指针而不是结构体值?
以C语言为例,我们知道在C中如果对一个指针变量进行修改,那么它的“副本”们也都会被修改。所以在Go中,如果你的方法是需要对结构体本身修改的,请使用指针作为接收器。否则,以值为接收器,改动将无效(类似slice,map特殊结构体)。你的结构体很大,用一个指针传递,会节约资源。为统一起见,如果你的大多方法以指针为接收器,请把其他方法也优先以指针作为接收器,不然调用时可能会提示该方法不属于某结构体的乌龙错误。
5)函数类型
函数也可以以申明的方式被使用,作为一个函数类型,如下所示:
1 | // 声明 Greeting 函数类型 |
GO 是类C语言,也就是面向过程语言。见此
以C语言为例,它是没有类这种概念的,只有结构体。
在C中,编写一个结构体的方法,我们通常采用以下写法:
1 | void func(s *Student, id int){ |
把第一个参数做为该方法的 “类对象”,也称为 接受者,receiver。
而 Go只是把C语言中的第一个参数放到方法前面 而已,所以它并不是用来类型转换的,而是一个接收者,说明该方法属于哪个结构体。
2、传递变长参数
如果函数的最后一个参数是采用 …type 的形式,那么这个函数就可以处理一个变长的参数,这个长度可以为 0,这样的函数称为变长函数。
1 | func myFunc(a, b, arg ...int) {} |
这个函数接受一个类似某个类型的 slice 的参数,该参数可以通过 for 循环结构迭代。
如果参数被存储在一个 slice 类型的变量 slice 中,则可以通过 slice… 的形式来传递参数调用变参函数,如下所示:
1 | package main |
3、defer 和追踪
关键字 defer 允许我们推迟到函数返回之前(或任意位置执行 return 语句之后)一刻才执行某个语句或函数(为什么要在返回之后才执行这些语句?因为 return 语句同样可以包含一些操作,而不是单纯地返回某个值)。
关键字 defer 的用法类似于面向对象编程语言 Java 和 C# 的 finally 语句块,它一般用于释放某些已分配的资源。
示例:
1 | package main |
使用 defer 的语句同样可以接受参数,下面这个例子就会在执行 defer 语句时打印 0:
1 | func a() { |
当有多个 defer 行为被注册时,它们会以逆序执行(类似栈,即后进先出):
1 | func f() { |
1)使用 defer 语句实现代码追踪
一个基础但十分实用的实现代码执行追踪的方案就是在进入和离开某个函数打印相关的消息,即可以提炼为下面两个函数:
1 | func trace(s string) { fmt.Println("entering:", s) } |
示例:
1 | package main |
2)使用 defer 语句来记录函数的参数与返回值
1 | package main |
4、内置函数
| 名称 | 说明 |
|---|---|
| close | 用于管道通信 |
| len、cap | len 用于返回某个类型的长度或数量(字符串、数组、切片、map 和管道);cap 是容量的意思,用于返回某个类型的最大容量(只能用于切片和 map) |
| new、make | new 和 make 均是用于分配内存:new 用于值类型和用户定义的类型,如自定义结构,make 用于内置引用类型(切片、map 和管道)。它们的用法就像是函数,但是将类型作为参数:new (type)、make (type)。new (T) 分配类型 T 的零值并返回其地址,也就是指向类型 T 的指针。它也可以被用于基本类型:v := new(int)。make (T) 返回类型 T 的初始化之后的值,因此它比 new 进行更多的工作 new () 是一个函数,不要忘记它的括号 |
| copy、append | 用于复制和连接切片 |
| panic、recover | 两者均用于错误处理机制 |
| print、println | 底层打印函数,在部署环境中建议使用 fmt 包 |
| complex、real、imag | 用于创建和操作复数 |
5、将函数作为参数
函数可以作为其它函数的参数进行传递,然后在其它函数内调用执行,一般称之为回调。
例子如下:
1 | package main |
6、匿名函数(闭包,函数式语言的术语)
当我们不希望给函数起名字的时候,可以使用匿名函数,例如:
1 | func(x, y int) int { return x + y }。 |
当然,也可以直接对匿名函数进行调用:func(x, y int) int { return x + y } (3, 4)。
具体语法如下所示:
1 | func() { |
表示参数列表的第一对括号必须紧挨着关键字 func,因为匿名函数没有名称。花括号 {} 涵盖着函数体,最后的一对括号表示对该匿名函数的调用。
具体例子如下所示:
1 | package main |
我们可以看到变量 g 代表的是 func(int),变量的值是一个内存地址。
所以我们实际上拥有的是一个函数值:匿名函数可以被赋值给变量并作为值使用。
二、数组与切片
1、数组(概念和java相同,略过)
Go 语言中的数组是一种 值类型(不像 C/C++ 中是指向首元素的指针),所以可以通过 new() 来创建: var arr1 = new([5]int)。
那么这种方式和 var arr2 [5]int 的区别是什么呢?arr1 的类型是 *[5]int,而 arr2 的类型是 [5]int。
这样的结果就是当把一个数组赋值给另一个时,需要再做一次数组内存的拷贝操作。例如:
1 | arr2 := *arr1 |
这样两个数组就有了不同的值,在赋值后修改 arr2 不会对 arr1 生效。
所以在函数中数组作为参数传入时,如 func1(arr2),会产生一次数组拷贝,func1 方法不会修改原始的数组 arr2。
如果你想修改原数组,那么 arr2 必须通过 & 操作符以引用方式传过来,例如 func1 (&arr2),例子如下所示:
1 | package main |
1)数组初始化
例子如下所示:
1 | package main |
2)将数组传递给函数
把一个大数组传递给函数会消耗很多内存。有两种方法可以避免这种现象:
- 传递数组的指针
- 使用数组的切片
传递数组的指针
例子如下所示:
1 | package main |
但这在 Go 中并不常用,通常使用切片。
使用数组的切片
例子如下所示:
1 | package main |
2、切片
1)概念
切片(slice)是对数组一个 连续片段的引用(该数组我们称之为相关数组,通常是匿名的),所以 切片是一个引用类型(因此更类似于 C/C++ 中的数组类型,或者 Python 中的 list 类型)。这个片段可以是整个数组,或者是由起始和终止索引标识的一些项的子集。需要注意的是,终止索引标识的项不包括在切片内。
特点如下所示:
- 切片是一个引用类型
- 切片是可索引的,并且可以由 len() 函数获取长度。
- 给定项的切片索引可能比相关数组的相同元素的索引小。
- 和数组不同的是,切片的长度可以在运行时修改,最小为 0 ,最大为相关数组的长度:切片是一个长度可变的数组。
- 切片提供了计算容量的函数 cap() 可以测量切片最长可以达到多少:它等于切片从第一个元素开始,到相关数组末尾的元素个数。对于 切片 s 来说该不等式永远成立:0 <= len(s) <= cap(s)。
- 多个切片如果表示同一个数组的片段,它们可以共享数据;因此一个切片和相关数组的其他切片是共享存储的,相反,不同的数组总是代表不同的存储。数组实际上是切片的构建块。
声明切片的格式,如下所示:
1 | var identifier []type(不需要说明长度) |
一个切片在未初始化之前默认为 nil,长度为 0。
切片的初始化格式,如下所示:
1 | var slice1 []type = arr1[start:end] |
这表示 slice1 是由数组 arr1 从 start 索引到 end-1 索引之间的元素构成的子集(切分数组,start:end 被称为 slice 表达式)。所以 slice1[0] 就等于 arr1[start]。这可以在 arr1 被填充前就定义好。
如果某个人写:var slice1 []type = arr1[:] 那么 slice1 就等于完整的 arr1 数组(所以这种表示方式是 arr1[0:len(arr1)] 的一种缩写)。另外一种表述方式是:slice1 = &arr1。
arr1[2:] 和 arr1[2:len(arr1)] 相同,都包含了数组从第三个到最后的所有元素。
arr1[:3] 和 arr1[0:3] 相同,包含了从第一个到第三个元素(不包括第四个 / 不包含下标为三的元素)。
如果你想去掉 slice1 的最后一个元素,只要 slice1 = slice1[:len(slice1)-1]。
一个由数字 1、2、3 组成的切片可以这么生成:s := [3]int{1,2,3}[:] 甚至更简单的 s := []int{1,2,3}。
s2 := s[:] 是用切片组成的切片,拥有相同的元素,但是 仍然指向相同的相关数组。
一个切片 s 可以这样扩展到它的大小上限:s = s[:cap(s)],如果再扩大的话就会导致运行时错误。
切片也可以用类似数组的方式初始化:var x = []int{2, 3, 5, 7, 11}。这样就创建了一个长度为 5 的数组并且创建了一个相关切片。
2)切片的内存结构
切片在内存中的组织方式实际上是一个有 3 个域的结构体:
- 指向相关数组的指针
- 切片长度:切片的长度就是它所包含的元素个数。
- 切片容量:切片的容量是从它的第一个元素开始数,到其底层数组元素末尾的个数。
一个长度为 2,容量为 4 的切片 y,如下所示:
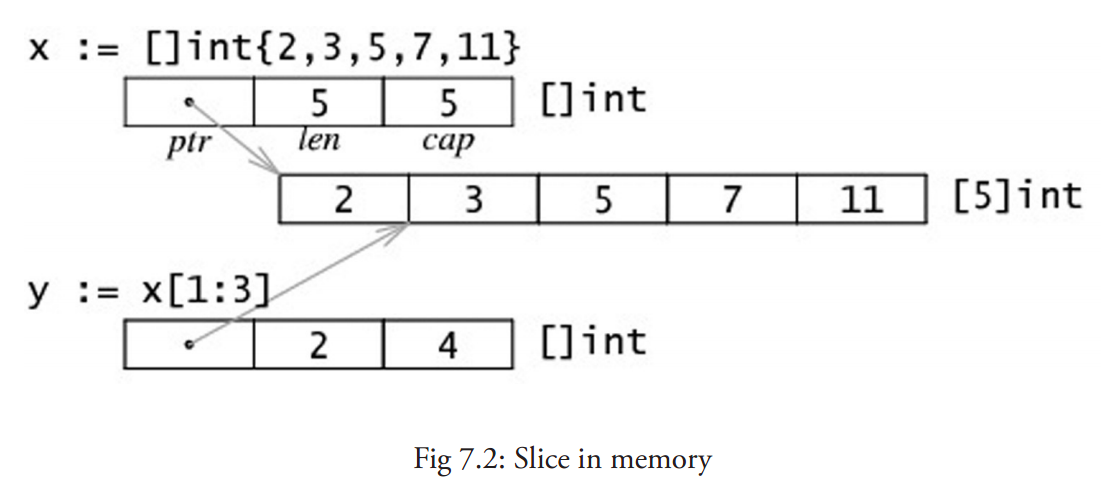
1 | y[0] = 3 且 y[1] = 5。 |
切片 s 的长度和容量可通过表达式 len(s) 和 cap(s) 来获取。
注意: 绝对不要用指针指向 slice。切片本身已经是一个引用类型,所以它本身就是一个指针!!
3)创建切片
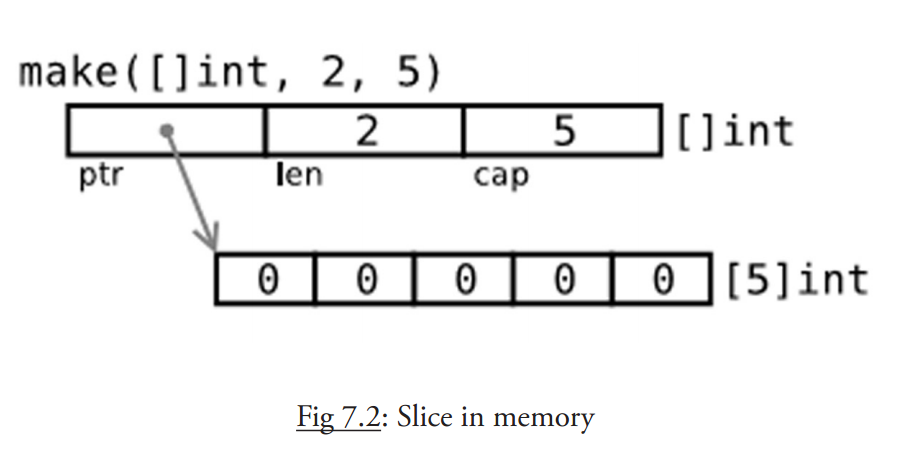
当相关数组还没有定义时,我们可以使用 make () 函数来创建一个切片 同时创建好相关数组:var slice1 []type = make([]type, len)。
也可以简写为 slice1 := make([]type, len),这里 len 是数组的长度并且也是 slice 的初始长度。
所以定义 s2 := make([]int, 10),那么 cap(s2) == len(s2) == 10。
make 接受 2 个参数:元素的类型以及切片的元素个数。
如果你想创建一个 slice1,它不占用整个数组,而只是占用以 len 为个数个项,那么只要:slice1 := make([]type, len, cap)。
make 的使用方式是:func make([]T, len, cap),其中 cap 是可选参数。
所以下面两种方法可以生成相同的切片:
1 | make([]int, 50, 100) |
使用 make 方法生成的切片的内存结构,如下图所示:
例子如下所示:
1 | package main |
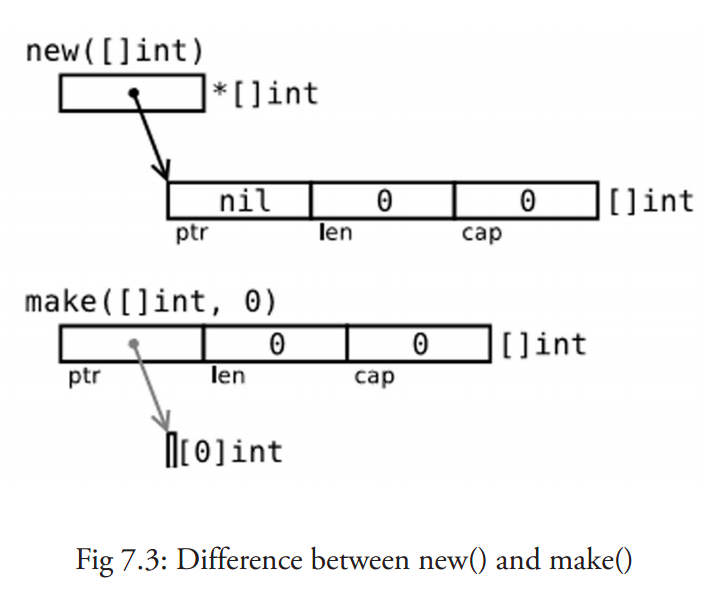
4)new () 和 make () 的区别
看起来二者没有什么区别,都在堆上分配内存,但是它们的行为不同,适用于不同的类型。
- new (T) 为每个新的类型 T 分配一片内存,初始化为 0 并且返回类型为 * T 的内存地址:这种方法 返回一个指向类型为 T,值为 0 的地址的指针,它适用于值类型如数组和结构体;它相当于 &T{}。
- make(T) 返回一个类型为 T 的初始值,它只适用于 3 种内建的引用类型:切片、map 和 channel。
换言之,new 函数分配内存,make 函数初始化;下图给出了区别:
5)多维切片
Go语言中同样允许使用多维切片,声明一个多维数组的语法格式如下:
1 | var sliceName [][]...[]sliceType |
下面以二维切片为例,声明一个二维切片并赋值,代码如下所示:
1 | //声明一个二维切片 |
6)遍历切片
语法如下所示:
1 | for ix, value := range slice1 { |
例子如下所示:
1 | package main |
遍历多维切片:
1 | for row := range screen { |
7)切片的追加
1 | func append(s[]T, x ...T) []T |
其中 append 方法将 0 个或多个具有相同类型 s 的元素追加到切片后面并且返回新的切片;追加的元素必须和原切片的元素同类型。如果 s 的容量不足以存储新增元素,append 会分配新的切片来保证已有切片元素和新增元素的存储。因此,返回的切片可能已经指向一个不同的相关数组了。append 方法总是返回成功,除非系统内存耗尽了。
如果你想将切片 y 追加到切片 x 后面,只要将第二个参数扩展成一个列表即可:x = append(x, y…)。
例子如下所示:
1 | package main |
8)切片的复制
1 | func copy(dst, src []T) int |
copy 方法将类型为 T 的切片从源地址 src 拷贝到目标地址 dst,覆盖 dst 的相关元素,并且返回拷贝的元素个数。
源地址和目标地址可能会有重叠。拷贝个数是 src 和 dst 的长度最小值。如果 src 是字符串那么元素类型就是 byte。如果你还想继续使用 src,在拷贝结束后执行 src = dst。
例子如下所示:
1 | package main |
三、Map
map 是引用类型,可以使用如下声明:
1 | var map1 map[keytype]valuetype |
- 在声明的时候不需要知道 map 的长度,map 是可以动态增长的。
- 未初始化的 map 的值是 nil。
- key 可以是任意可以用 == 或者!= 操作符比较的类型,比如 string、int、float。
- 切片和结构体不能作为 key (译者注:含有数组切片的结构体不能作为 key,只包含内建类型的 struct 是可以作为 key 的,但是指针和接口类型可以。)
- value 可以是任意类型的;通过使用空接口类型,我们可以存储任意值,但是使用这种类型作为值时需要先做一次类型断言。
- map 传递给函数的代价很小:在 32 位机器上占 4 个字节,64 位机器上占 8 个字节,无论实际上存储了多少数据。
- map 也可以用函数作为自己的值,这样就可以用来做分支结构:key 用来选择要执行的函数。
1)map初始化
1 | var map1 = make(map[keytype]valuetype) |
注意:不要使用 new,永远用 make 来构造 map
1 | 如果你错误的使用 new () 分配了一个引用对象,你会获得一个空引用的指针,相当于声明了一个未初始化的变量并且取了它的地址: |
2)map容量
和数组不同,map 可以根据新增的 key-value 对动态的伸缩,因此它不存在固定长度或者最大限制。
但是你也可以选择标明 map 的初始容量 capacity,就像这样:make(map[keytype]valuetype, cap)。例如:
1 | map2 := make(map[string]float32, 100) |
当 map 增长到容量上限的时候,如果再增加新的 key-value 对,map 的大小会自动加 1。所以出于性能的考虑,对于大的 map 或者会快速扩张的 map,即使只是大概知道容量,也最好先标明
3)用切片作为 map 的值
既然一个 key 只能对应一个 value,而 value 又是一个原始类型,那么如果一个 key 要对应多个值怎么办?例如,当我们要处理 unix 机器上的所有进程,以父进程(pid 为整型)作为 key,所有的子进程(以所有子进程的 pid 组成的切片)作为 value。通过将 value 定义为 []int 类型或者其他类型的切片,就可以优雅的解决这个问题。
例子如下所示:
1 | mp1 := make(map[int][]int) |
4)测试键值对是否存在及删除元素
1 | val1, isPresent = map1[key1] |
isPresent 返回一个 bool 值:如果 key1 存在于 map1,val1 就是 key1 对应的 value 值,并且 isPresent 为 true;如果 key1 不存在,val1 就是一个空值,并且 isPresent 会返回 false。
如果你只是想判断某个 key 是否存在而不关心它对应的值到底是多少,你可以这么做:
1 | _, ok := map1[key1] // 如果key1存在则ok == true,否则ok为false |
或者和 if 混合使用:
1 | if _, ok := map1[key1]; ok { |
从 map1 中删除 key1:
1 | delete(map1, key1) |
如果 key1 不存在,该操作不会产生错误。
例子如下所示:
1 | package main |
5)for-range 的配套用法
遍历 map:
1 | for key, value := range map1 { |
第一个返回值 key 是 map 中的 key 值,第二个返回值则是该 key 对应的 value 值;这两个都是仅 for 循环内部可见的局部变量。其中第一个返回值 key 值是一个可选元素。如果你只关心值,可以这么使用:
1 | for _, value := range map1 { |
如果只想获取 key,你可以这么使用:
1 | for key := range map1 { |
示例如下所示:
1 | package main |
注意:map 不是按照 key 的顺序排列的,也不是按照 value 的序排列的。
6)map 的排序
map 默认是无序的,不管是按照 key 还是按照 value 默认都不排序。
如果你想为 map 排序,需要将 key(或者 value)拷贝到一个切片,再对切片排序,然后可以使用切片的 for-range 方法打印出所有的 key 和 value。
例子如下所示:
1 | package main |
7)map 类型的切片
假设我们想获取一个 map 类型的切片,我们必须使用两次 make() 函数,第一次分配切片,第二次分配 切片中每个 map 元素。例子如下所示:
1 | package main |
四、结构体
结构体定义的一般方式如下:
1 | type identifier struct { |
使用 new 创建一个结构体:
1 | 第一种: |
上面的语句表示,变量 t 是一个指向 T 的指针,此时结构体字段的值是它们所属类型的零值。
声明 var t T 也会给 t 分配内存,并零值化内存,但是这个时候 t 是类型 T。在这几种方式中,t 通常被称做类型 T 的一个实例(instance)或对象(object)。
例子如下所示:
1 | package main |
就像在面向对象语言所作的那样,可以使用点号符给字段赋值:structname.fieldname = value。
同样的,使用点号符可以获取结构体字段的值:structname.fieldname。
在 Go 语言中这叫 选择器(selector)。无论变量是一个结构体类型还是一个结构体类型指针,都使用同样的 选择器符(selector-notation) 来引用结构体的字段:
1 | type myStruct struct { i int } |
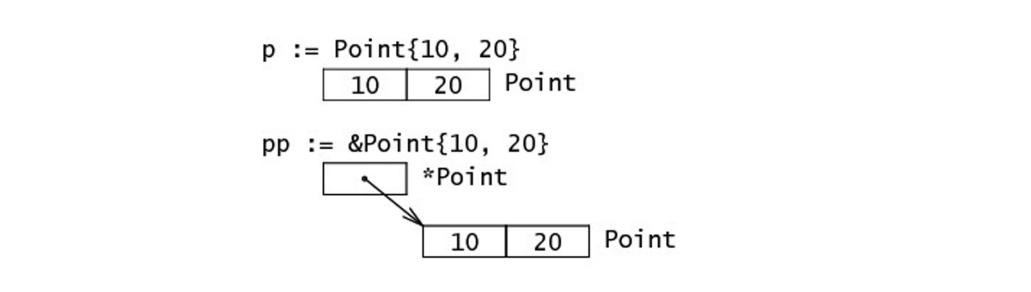
1)初始化一个结构体
1 | // 此时ms的类型是 *struct1 |
混合字面量语法(composite literal syntax)&struct1{a, b, c} 是一种简写,底层仍然会调用 new (),这里值的顺序必须按照字段顺序来写。
表达式 new(Type) 和 &Type{} 是等价的。
例子如下所示:
1 | type Interval struct { |
2)结构体类型的内存布局
1 | type Point struct { x, y int } |
使用 new 初始化:

作为结构体字面量初始化:
3)三种不同的调用方式
1 | package main |
4)结构体转换
Go 中的类型转换遵循严格的规则。当为结构体定义了一个 alias 类型时,此结构体类型和它的 alias 类型都有相同的底层类型,它们可以互相转换,同时需要注意其中非法赋值或转换引起的编译错误。
例子如下所示:
1 | package main |
5)使用工厂方法创建结构体实例
Go 语言不支持面向对象编程语言中那样的构造子方法,但是可以很容易的在 Go 中实现 “构造子工厂” 方法。为了方便通常会为类型定义一个工厂,按惯例,工厂的名字以 new 或 New 开头。假设定义了如下的 File 结构体类型:
1 | type File struct { |
下面是这个结构体类型对应的工厂方法,它返回一个指向结构体实例的指针:
1 | func NewFile(fd int, name string) *File { |
然后这样调用它:
1 | f := NewFile(10, "./test.txt") |
在 Go 语言中常常像上面这样在工厂方法里使用初始化来简便的实现构造函数。
如果 File 是一个结构体类型,那么表达式 new(File) 和 &File{} 是等价的。
我们可以说是工厂实例化了类型的一个对象,就像在基于类的 OOP 语言中那样。
如果想知道结构体类型 T 的一个实例占用了多少内存,可以使用:size := unsafe.Sizeof(T{})。
5)如何强制使用工厂方法
通过应用可见性规则就可以禁止使用 new 函数,强制用户使用工厂方法,从而使类型变成私有的,就像在面向对象语言中那样。
例子如下所示:
1 | package factory |
下面的例子说明了在映射上使用 new 和 make 的区别以及可能发生的错误:
1 | package main |
试图 make() 一个结构体变量,会引发一个编译错误,这还不是太糟糕,但是 new() 一个映射并试图使用数据填充它,将会引发运行时错误! 因为 new(Foo) 返回的是一个指向 nil 的指针,它尚未被分配内存。所以在使用 map 时要特别谨慎。
6)带标签的结构体
结构体中的字段除了有名字和类型外,还可以有一个可选的标签(tag):它是一个附属于字段的字符串,可以是文档或其他的重要标记。标签的内容不可以在一般的编程中使用,只有包 reflect 能获取它。
1 | package main |
7)匿名字段和内嵌结构体
结构体可以包含一个或多个 匿名(或内嵌)字段,即这些字段没有显式的名字,只有字段的类型是必须的,此时类型就是字段的名字。匿名字段本身可以是一个结构体类型,即 结构体可以包含内嵌结构体。
例子如下所示:
1 | package main |
通过类型 outer.int 的名字来获取存储在匿名字段中的数据,于是可以得出一个结论:在一个结构体中对于每一种数据类型只能有一个匿名字段。
8)命名冲突
当两个字段拥有相同的名字(可能是继承来的名字)时该怎么办呢?
- 外层名字会覆盖内层名字(但是两者的内存空间都保留),这提供了一种重载字段或方法的方式;
- 如果相同的名字在同一级别出现了两次,如果这个名字被程序使用了,将会引发一个错误(不使用没关系)。没有办法来解决这种问题引起的二义性,必须由程序员自己修正。
例子如下所示:
1 | package main |
五、方法
Go 方法是作用在接收者(receiver)上的一个函数,接收者是某种类型的变量。因此方法是一种特殊类型的函数。
定义方法的一般格式如下:
1 | func (recv receiver_type) methodName(parameter_list) (return_value_list) { ... } |
接收者类型可以是(几乎)任何类型,不仅仅是结构体类型:任何类型都可以有方法,甚至可以是函数类型,可以是 int、bool、string 或数组的别名类型。
但是接收者不能是一个接口类型,因为接口是一个抽象定义,但是方法却是具体实现;如果这样做会引发一个编译错误:invalid receiver type…。
最后接收者不能是一个指针类型,但是它可以是任何其他允许类型的指针。
一个类型加上它的方法等价于面向对象中的一个类。
一个重要的区别是:在 Go 中,类型的代码 和绑定在它上面的 方法的代码 可以不放置在一起,它们 可以存在在不同的源文件,唯一的要求是: 它们必须是同一个包的。
因为方法是函数,所以同样的,不允许方法重载,即对于一个类型只能有一个给定名称的方法。但是如果基于接收者类型,是有重载的:具有同样名字的方法可以在 2 个或多个不同的接收者类型上存在,比如在同一个包里这么做是允许的:
1 | func (a *denseMatrix) Add(b Matrix) Matrix |
例子如下所示:
1 | package main |
错误示例如下所示:
1 | package main |
类型和作用在它上面定义的方法必须在同一个包里定义,这就是为什么不能在 int、float 或类似这些的类型上定义方法。
但是有一个间接的方式:可以先定义该类型(比如:int 或 float)的别名类型,然后再为别名类型定义方法。或者像下面这样将它作为匿名类型嵌入在一个新的结构体中。当然方法只在这个别名类型上有效。
1 | package main |
1)函数和方法的区别
函数将变量作为参数:Function1(recv)
方法在变量上被调用:recv.Method1()
在接收者是指针时,方法可以改变接收者的值(或状态),这点函数也可以做到(当参数作为指针传递,即通过引用调用时,函数也可以改变参数的状态)。
不要忘记 Method1 后边的括号 (),否则会引发编译器错误:method recv.Method1 is not an expression, must be called
接收者必须有一个显式的名字,这个名字必须在方法中被使用。
receiver_type 叫做 (接收者)基本类型,这个类型必须在和方法同样的包中被声明。
在 Go 中,(接收者)类型关联的方法不写在类型结构里面,就像类那样;耦合更加宽松;类型和方法之间的关联由接收者来建立。
方法没有和数据定义(结构体)混在一起:它们是正交的类型;表示(数据)和行为(方法)是独立的。
2)指针或值作为接收者
鉴于性能的原因,recv 最常见的是一个指向 receiver_type 的指针(因为我们不想要一个实例的拷贝,如果按值调用的话就会是这样),特别是在 receiver 类型是结构体时,就更是如此了。
如果想要方法改变接收者的数据,就在接收者的指针类型上定义该方法。否则,就在普通的值类型上定义方法。
例子如下所示:
1 | package main |
指针方法和值方法都可以在指针或非指针上被调用。
如下面程序所示,类型 List 在值上有一个方法 Len(),在指针上有一个方法 Append(),但是可以看到两个方法都可以在两种类型的变量上被调用。
1 | package main |
3)方法和未导出字段
如果类型 Person 被明确的导出了,但是它的字段没有被导出。则 p.firstName 就是错误的。该如何在另一个程序中修改或者只是读取一个 Person 的名字呢?
这可以通过面向对象语言一个众所周知的技术来完成:提供 getter 和 setter 方法。对于 setter 方法使用 Set 前缀,对于 getter 方法只使用成员名。
如下所示:
1 | package person |
1 | package main |
4)内嵌类型的方法和继承
当一个匿名类型被内嵌在结构体中时,匿名类型的可见方法也同样被内嵌,这在效果上等同于外层类型 继承 了这些方法:将父类型放在子类型中来实现亚型。这个机制提供了一种简单的方式来模拟经典面向对象语言中的子类和继承相关的效果,也类似 Ruby 中的混入(mixin)。
例子如下所示:
1 | package main |
内嵌将一个已存在类型的字段和方法注入到了另一个类型里:匿名字段上的方法 “晋升” 成为了外层类型的方法。
当然类型可以有只作用于本身实例而不作用于内嵌 “父” 类型上的方法,可以覆写方法(像字段一样):和内嵌类型方法具有同样名字的外层类型的方法会覆写内嵌类型对应的方法。
基于上面的代码,加上如下方法:
1 | func (n *NamedPoint) Abs() float64 { |
结构体内嵌和自己在同一个包中的结构体时,可以彼此访问对方所有的字段和方法。
5)如何在类型中嵌入功能
例子如下所示:
1 | package main |
6)多重继承
多重继承指的是类型获得多个父类型行为的能力,它在传统的面向对象语言中通常是不被实现的(C++ 和 Python 例外)。
因为在类继承层次中,多重继承会给编译器引入额外的复杂度。
但是在 Go 语言中,通过在类型中嵌入所有必要的父类型,可以很简单的实现多重继承。
作为一个例子,假设有一个类型 CameraPhone,通过它可以 Call(),也可以 TakeAPicture(),但是第一个方法属于类型 Phone,第二个方法属于类型 Camera。
只要嵌入这两个类型就可以解决问题,如下所示:
1 | package main |
7)类型的 String() 方法和格式化描述符
如果类型定义了 String() 方法,它会被用在 fmt.Printf() 中生成默认的输出:等同于使用格式化描述符 %v 产生的输出。还有 fmt.Print() 和 fmt.Println() 也会自动使用 String() 方法。
1 | package main |
从上面的例子也可以看到,格式化描述符 %T 会给出类型的完全规格,%#v 会给出实例的完整输出,包括它的字段。
注意:不要在 String() 方法里面调用涉及 String() 方法的方法,它会导致意料之外的错误
比如下面的例子,它导致了一个无限迭代(递归)调用(TT.String() 调用 fmt.Sprintf,而 fmt.Sprintf 又会反过来调用 TT.String()…),很快就会导致内存溢出。
1 | type TT float64 |
8)垃圾回收和 SetFinalizer
Go 开发者不需要写代码来释放程序中不再使用的变量和结构占用的内存,在 Go 运行时中有一个独立的进程,即垃圾收集器(GC),会处理这些事情,它搜索不再使用的变量然后释放它们的内存。
通过调用 runtime.GC() 函数可以显式的触发 GC,但这只在某些罕见的场景下才有用,比如当内存资源不足时调用 runtime.GC(),它会在此函数执行的点上立即释放一大片内存,此时程序可能会有短时的性能下降(因为 GC 进程在执行)。
如果想知道当前的内存状态,可以使用:
1 | var m runtime.MemStats |
如果需要在一个对象 obj 被从内存移除前执行一些特殊操作,比如写到日志文件中,可以通过如下方式调用函数来实现:
1 | runtime.SetFinalizer(obj, func(obj *typeObj)) |
六、接口
接口定义了一组方法(方法集),但是这些方法不包含(实现)代码:它们没有被实现(它们是抽象的)。接口里也不能包含变量。
通过如下格式定义接口:
1 | type Namer interface { |
特点如下:
- 类型不需要显式声明它实现了某个接口:接口被隐式地实现。多个类型可以实现同一个接口。
- 实现某个接口的类型(除了实现接口方法外)可以有其他的方法。
- 一个类型可以实现多个接口。
- 接口类型可以包含一个实例的引用, 该实例的类型实现了此接口(接口是动态类型)。
例子如下所示:
1 | package main |
现在接口变量包含一个指向 Square 变量的引用,通过它可以调用 Square 上的方法 Area()。
当然也可以直接在 Square 的实例上调用此方法,但是在接口实例上调用此方法更令人兴奋,它使此方法更具有一般性。接口变量里包含了接收者实例的值和指向对应方法表的指针。
如果 Square 没有实现 Area() 方法,编译器将会给出清晰的错误信息:
1 | cannot use sq1 (type *Square) as type Shaper in assignment: |
如果 Shaper 有另外一个方法 Perimeter(),但是 Square 没有实现它,即使没有人在 Square 实例上调用这个方法,编译器也会给出上面同样的错误。
1)接口命名
接口的名字由方法名加 er 后缀组成,例如 Printer、Reader、Writer、Logger、Converter 等等。
还有一些不常用的方式(当后缀 er 不合适时),比如 Recoverable,此时接口名以 able 结尾,或者以 I 开头(像 .NET 或 Java 中那样)。
2)接口值
不像大多数面向对象编程语言,在 Go 语言中接口可以有值,一个接口类型的变量或一个接口值 :
1 | var ai Namer |
3)多态
多态是面向对象编程中一个广为人知的概念:根据当前的类型选择正确的方法,或者说:同一种类型在不同的实例上似乎表现出不同的行为。
例子如下所示:
1 | package main |
4)接口嵌套接口
一个接口可以包含一个或多个其他的接口,这相当于直接将这些内嵌接口的方法列举在外层接口中一样。
例子如下所示:
1 | type ReadWrite interface { |
5)类型断言:如何检测和转换接口变量的类型
一个接口类型的变量 varI 中可以包含任何类型的值,必须有一种方式来检测它的 动态 类型,即运行时在变量中存储的值的实际类型。
通常我们可以使用 类型断言 来测试在某个时刻 varI 是否包含类型 T 的值:
1 | v := varI.(T) // unchecked type assertion |
varI 必须是一个接口变量,否则编译器会报错:invalid type assertion: varI.(T) (non-interface type (type of varI) on left) 。
例子如下所示:
1 | package main |
5)类型判断:type-switch
接口变量的类型也可以使用一种特殊形式的 switch 来检测:type-switch。
例子如下所示:
1 | package main |
6)测试一个值是否实现了某个接口
假定 v 是一个值,然后我们想测试它是否实现了 Stringer 接口,可以这样做:
1 | package main |
7)使用方法集与接口
作用于变量上的方法实际上是不区分变量到底是指针还是值的。
当碰到接口类型值时,这会变得有点复杂,原因是接口变量中存储的具体值是不可寻址的。
参考下面的代码:
1 | package main |
在 lst 上调用 CountInto 时会导致一个编译器错误,因为 CountInto 需要一个 Appender,而它的方法 Append 只定义在指针上。 在 lst 上调用 LongEnough 是可以的因为 ‘Len’ 定义在值上。
在 plst 上调用 CountInto 是可以的,因为 CountInto 需要一个 Appender,并且它的方法 Append 定义在指针上。 在 plst 上调用 LongEnough 也是可以的,因为指针会被自动解引用。
将一个值赋值给一个接口时,编译器会确保所有可能的接口方法都可以在此值上被调用,因此不正确的赋值在编译期就会失败。
总结:
在接口上调用方法时,必须有和方法定义时相同的接收者类型或者是可以从具体类型 P 直接可以辨识的:
- 指针方法可以通过指针调用
- 值方法可以通过值调用
- 接收者是值的方法可以通过指针调用,因为指针会首先被解引用
- 接收者是指针的方法不可以通过值调用,因为存储在接口中的值没有地址
Go 语言规范定义了接口方法集的调用规则:
1 | 类型 *T 的可调用方法集包含接受者为 *T 或 T 的所有方法集 |
8)相同方法集的接口
如果有多个接口,且这些接口里的方法定义相同,则类型可以互相转换
1 | package main |
9)使用 sort.Interface 接口排序
一个很好的例子是来自标准库的 sort 包,要对一组数字或字符串排序,只需要实现三个方法:
- 反映元素个数的 Len() 方法
- 比较第 i 和 j 个元素的 Less(i, j) 方法
- 交换第 i 和 j 个元素的 Swap(i, j) 方法
例子如下所示:
1 | package main |
10)Go 中的面向对象
我们总结一下前面看到的:Go 没有类,而是松耦合的类型、方法对接口的实现。
OO(面向对象) 语言最重要的三个方面分别是:封装,继承和多态,在 Go 中它们是怎样表现的呢?
封装(数据隐藏)
Go 和别的 OO(面向对象) 语言有 4 个或更多的访问层次相比,Go 把它简化为了 2 层(Go可见性规则):
1)包范围内的:通过标识符首字母小写,对象只在它所在的包内可见
2)可导出的:通过标识符首字母大写,对象对所在包以外也可见
类型只拥有自己所在包中定义的方法
- 继承:用组合实现:内嵌一个(或多个)包含想要的行为(字段和方法)的类型;多重继承可以通过内嵌多个类型实现
- 多态:用接口实现:某个类型的实例可以赋给它所实现的任意接口类型的变量。类型和接口是松耦合的,并且多重继承可以通过实现多个接口实现。Go 接口不是 Java 和 C# 接口的变体,而且:接口间是不相关的,并且是大规模编程和可适应的演进型设计的关键。
11)接口与动态类型
在经典的面向对象语言(像 C++,Java 和 C#)中数据和方法被封装为 类 的概念:类包含它们两者,并且不能剥离。
Go 没有类:数据(结构体或更一般的类型)和方法是一种松耦合的正交关系。
Go 中的接口跟 Java/C# 类似:都是必须提供一个指定方法集的实现。但是更加灵活通用:任何提供了接口方法实现代码的类型都隐式地实现了该接口,而不用显式地声明。
和其它语言相比,Go 是唯一结合了接口值,静态类型检查(是否该类型实现了某个接口),运行时动态转换的语言,并且不需要显式地声明类型是否满足某个接口。 该特性允许我们在不改变已有的代码的情况下定义和使用新接口。
接收一个(或多个)接口类型作为参数的函数,其实参数可以是任何实现了该接口的类型。实现了某个接口的类型可以被传给任何以此接口为参数的函数。
类似于 Python 和 Ruby 这类动态语言中的 动态类型(duck typing);这意味着对象可以根据提供的方法被处理(例如,作为参数传递给函数),而忽略它们的实际类型:它们能做什么比它们是什么更重要。
例子如下所示:
1 | package main |
动态方法调用
像 Python,Ruby 这类语言,动态类型是延迟绑定的(在运行时进行):方法只是用参数和变量简单地调用,然后在运行时才解析(它们很可能有像 responds_to 这样的方法来检查对象是否可以响应某个方法,但是这也意味着更大的编码量和更多的测试工作)。
Go 的实现与此相反,通常需要编译器静态检查的支持:当变量被赋值给一个接口类型的变量时,编译器会检查其是否实现了该接口的所有函数。 如果方法调用作用于像 interface{} 这样的 “泛型” 上,你可以通过类型断言来检查变量是否实现了相应接口。
例如,你用不同的类型表示 XML 输出流中的不同实体。然后我们为 XML 定义一个如下的 “写” 接口(甚至可以把它定义为私有接口):
1 | type xmlWriter interface { |
现在我们可以实现适用于该流类型的任何变量的 StreamXML 函数,并用类型断言检查传入的变量是否实现了该接口;如果没有,我们就调用内建的 encodeToXML 来完成相应工作:
1 | // Exported XML streaming function. |
因此 Go 提供了动态语言的优点,却没有其他动态语言在运行时可能发生错误的缺点。
接口的提取
提取接口 是非常有用的设计模式,可以减少需要的类型和方法数量,而且不需要像传统的基于类的面向对象语言那样维护整个的类层次结构。
Go 接口可以让开发者找出自己写的程序中的类型。假设有一些拥有共同行为的对象,并且开发者想要抽象出这些行为,这时就可以创建一个接口来使用。
所以你不用提前设计出所有的接口;整个设计可以持续演进,而不用废弃之前的决定。类型要实现某个接口,它本身不用改变,你只需要在这个类型上实现新的方法。
显式地指明类型实现了某个接口
如果你希望满足某个接口的类型显式地声明它们实现了这个接口,你可以向接口的方法集中添加一个具有描述性名字的方法。例如:
1 | type Fooer interface { |
类型 Bar 必须实现 ImplementsFooer 方法来满足 Footer 接口,以清楚地记录这个事实。
1 | type Bar struct{} |
大部分代码并不使用这样的约束,因为它限制了接口的实用性。
但是有些时候,这样的约束在大量相似的接口中被用来解决歧义。
空接口和函数重载
在之前的学习中,我们看到函数重载是不被允许的。在 Go 语言中函数重载可以用 可变参数 …T 作为函数 最后一个参数 来实现。
如果我们把 T 换为空接口,那么可以知道任何类型的变量都是满足 T (空接口)类型的,这样就允许我们传递任何数量任何类型的参数给函数,即重载的实际含义。
函数 fmt.Printf 就是这样做的:
1 | fmt.Printf(format string, a ...interface{}) (n int, errno error) |
接口的继承
当一个类型包含(内嵌)另一个类型(实现了一个或多个接口)的指针时,这个类型就可以使用(另一个类型)所有的接口方法。
例如:
1 | type Task struct { |
这个类型的工厂方法像这样:
1 | func NewTask(command string, logger *log.Logger) *Task { |
当 log.Logger 实现了 Log() 方法后,Task 的实例 task 就可以调用该方法:
1 | task.Log() |
类型可以通过继承多个接口来提供像 多重继承 一样的特性:
1 | type ReaderWriter struct { |
上面概述的原理被应用于整个 Go 包,多态用得越多,代码就相对越少。这被认为是 Go 编程中的重要的最佳实践。
有用的接口可以在开发的过程中被归纳出来。添加新接口非常容易,因为已有的类型不用变动(仅仅需要实现新接口的方法)。
七、空接口
空接口或者最小接口 不包含任何方法,它对实现不做任何要求:
1 | type Any interface {} |
任何其他类型都实现了空接口(它不仅仅像 Java/C# 中 Object 引用类型),any 或 Any 是空接口一个很好的别名或缩写。
空接口类似 Java/C# 中所有类的基类: Object 类,二者的目标也很相近。
可以给一个空接口类型的变量 var val interface {} 赋任何类型的值。
1 | package main |
在上面的例子中,接口变量 val 被依次赋予一个 int,string 和 Person 实例的值,然后使用 type-switch 来测试它的实际类型。
每个 interface {} 变量在内存中占据两个字长:
- 一个用来存储它包含的类型。
- 另一个用来存储它包含的数据或者指向数据的指针。
1)构建通用类型或包含不同类型变量的数组
在之前的例子中我们看到了能被搜索和排序的 int 数组、float 数组以及 string 数组,那么对于其他类型的数组呢,是不是我们必须得自己编程实现它们?
现在我们知道该怎么做了,就是通过使用空接口。让我们给空接口定一个别名类型 Element:type Element interface{}
然后定义一个容器类型的结构体 Vector,它包含一个 Element 类型元素的切片:
1 | type Element interface{} |
Vector 里能放任何类型的变量,因为任何类型都实现了空接口,实际上 Vector 里放的每个元素可以是不同类型的变量。我们为它定义一个 At() 方法用于返回第 i 个元素:
1 | func (p *Vector) At(i int) Element { |
再定一个 Set() 方法用于设置第 i 个元素的值:
1 | func (p *Vector) Set(i int, e Element) { |
Vector 中存储的所有元素都是 Element 类型,要得到它们的原始类型(unboxing:拆箱)需要用到类型断言。
注意:The compiler rejects assertions guaranteed to fail,类型断言总是在运行时才执行,因此它会产生运行时错误。
练习:创建一个 Miner 接口并实现一些必要的操作。函数 Min 接受一个 Miner 类型变量的集合,然后计算并返回集合中最小的元素。
例子如下所示:
1 | package main |
2)复制数据切片至空接口切片
假设你有一个 myType 类型的数据切片,你想将切片中的数据复制到一个空接口切片中,类似:
1 | var dataSlice []myType = FuncReturnSlice() |
可惜不能这么做,编译时会出错:cannot use dataSlice (type []myType) as type []interface { } in assignment。
原因是它们俩在内存中的布局是不一样的。
必须使用 for-range 语句来一个一个显式地复制:
1 | var dataSlice []myType = FuncReturnSlice() |
3)通用类型的节点数据结构
列表和树这样的数据结构,在它们的定义中使用了一种叫节点的递归结构体类型,节点包含一个某种类型的数据字段。现在可以使用空接口作为数据字段的类型,这样我们就能写出通用的代码。
下面是实现一个二叉树的部分代码:通用定义、用于创建空节点的 NewNode 方法,及设置数据的 SetData 方法:
1 | package main |
3)接口到接口
一个接口的值可以赋值给另一个接口变量,只要底层类型实现了必要的方法。
这个转换是在运行时进行检查的,转换失败会导致一个运行时错误:这是 ‘Go’ 语言动态的一面,可以拿它和 Ruby 和 Python 这些动态语言相比较。
1 | package main |
八、反射
反射是用程序检查其所拥有的结构,尤其是类型的一种能力;这是元编程的一种形式。
反射可以在运行时检查类型和变量,例如它的大小、方法和 动态的调用这些方法。这对于没有源代码的包尤其有用。
变量的最基本信息就是类型和值:反射包的 Type 用来表示一个 Go 类型,反射包的 Value 为 Go 值提供了反射接口。
两个简单的函数,reflect.TypeOf 和 reflect.ValueOf,返回被检查对象的类型和值。
例如:
1 | // x 被定义为 |
实际上,反射是通过检查一个接口的值,变量首先被转换成空接口。这从下面两个函数签名能够很明显的看出来:
1 | func TypeOf(i interface{}) Type |
接口的值包含一个 type 和 value。
反射可以从接口值反射到对象,也可以从对象反射回接口值。
reflect.Type 和 reflect.Value 都有许多方法用于检查和操作它们。一个重要的例子是 Value 有一个 Type 方法返回 reflect.Value 的 Type。另一个是 Type 和 Value 都有 Kind 方法返回一个常量来表示类型:Uint、Float64、Slice 等等。同样 Value 有叫做 Int 和 Float 的方法可以获取存储在内部的值(跟 int64 和 float64 一样)
1 | Invalid Kind = iota |
对于 float64 类型的变量 x,如果 v:=reflect.ValueOf(x),那么 v.Kind() 返回 reflect.Float64 ,所以下面的表达式是 true
1 | v.Kind() == reflect.Float64 |
Kind 总是返回底层类型:
1 | type MyInt int |
示例代码:
1 | package main |
1)通过反射修改 (设置) 值
假设我们要把 x 的值改为 3.1415。Value 有一些方法可以完成这个任务,但是必须小心使用:v.SetFloat(3.1415)。
这将产生一个错误:reflect.Value.SetFloat using unaddressable value。
为什么会这样呢?问题的原因是 v 不是可设置的(这里并不是说值不可寻址)。是否可设置是 Value 的一个属性,并且不是所有的反射值都有这个属性:可以使用 CanSet() 方法测试是否可设置。
在例子中我们看到 v.CanSet() 返回 false: settability of v: false
当 v := reflect.ValueOf(x) 函数通过传递一个 x 拷贝创建了 v,那么 v 的改变并不能更改原始的 x。要想 v 的更改能作用到 x,那就必须传递 x 的地址 v = reflect.ValueOf(&x)。
通过 Type () 我们看到 v 现在的类型是 *float64 并且仍然是不可设置的。
要想让其可设置我们需要使用 Elem() 函数,这间接的使用指针:v = v.Elem()
现在 v.CanSet() 返回 true 并且 v.SetFloat(3.1415) 设置成功了!
例子如下所示:
1 | package main |
2)反射结构体
NumField() 方法返回结构体内的字段数量;通过一个 for 循环用索引取得每个字段的值 Field(i)。
我们同样能够调用签名在结构体上的方法,例如,使用索引 n 来调用:Method(n).Call(nil)。
例子如下所示:
1 | package main |
但是如果尝试更改一个值,会得到一个错误:
1 | panic: reflect.Value.SetString using value obtained using unexported field |
这是因为结构体中 只有被导出字段(首字母大写)才是可设置的。
来看下面的例子:
1 | package main |
参考文章
- 本文作者: th3ee9ine
- 本文链接: https://www.blog.ajie39.top/2022/05/07/go入门总结(二)/
- 版权声明: 本博客所有文章除特别声明外,均采用 LICENSE 下的许可协议。转载请注明出处!